
Swift Package to iOS app on Windows, from iPhone debugging to ipa
An app written as a Swift Package or in Swift Playgrounds compiles, but you can’t install it on an iPhone or build an .ipa from it, and that’s true on a Mac too. This tutorial converts such a package into an iOS app project on Windows, runs it on your iPhone for debugging, then builds it for the App Store. After that you keep editing the code in the package and the app project follows.
Before you start, have an iPhone and a cable, a certificate from your Apple Developer account, and a computer with KXBuild and the VS Code extension installed. If you haven’t installed them yet, follow the install page.
Which packages can be converted
You can convert a package whose executable target is itself an app, meaning the executable target has a SwiftUI entry point such as @main struct …: App, or a UIKit UIApplicationDelegate. Other cases are handled like this.
- Library-only packages. They exist to be used by apps, so they aren’t converted. Add the Swift Package as a dependency in your app project instead.
- Command-line programs. The executable target has no app entry point, and iOS can’t run command-line programs, so they aren’t converted either.
- Swift Playgrounds app projects. These can’t be converted directly yet. First turn them into a regular package, as described below.
The examples use a minimal package in D:\projects\Hello. Hello is the app and HelloCore is a library target the app uses.
1Hello\
2├─ Package.swift
3└─ Sources\
4   ├─ Hello\
5   │  └─ HelloApp.swift
6   └─ HelloCore\
7      └─ Greeting.swift
 1// swift-tools-version:5.9
 2import PackageDescription
 3
 4let package = Package(
 5    name: "Hello",
 6    platforms: [.iOS(.v16)],
 7    products: [
 8        .executable(name: "Hello", targets: ["Hello"])
 9    ],
10    targets: [
11        .executableTarget(name: "Hello", dependencies: ["HelloCore"]),
12        .target(name: "HelloCore")
13    ]
14)
 1import SwiftUI
 2import HelloCore
 3
 4@main
 5struct HelloApp: App {
 6    var body: some Scene {
 7        WindowGroup {
 8            Text(Greeting.text)
 9        }
10    }
11}
In VS Code, use File > Open Folder… to open the folder that contains Package.swift. Open any .swift file and you get code completion and error checking, with SwiftUI and UIKit APIs completed for iOS. Before converting, you can build once in the package folder to check the code.
1kxbuild build .
Convert to an app project
Use either of these.
- VS Code extension. Run
KXBuild: Convert Swift Package to App Projectfrom the Command Palette, or click the row marked “click to create an app project” in the KXBuild view. Enter the app name and bundle ID when prompted. If you leave the app name empty, the executable target’s name is used. The new project becomes the startup project automatically. - Command line. Run the command below in the folder that contains Package.swift. Then click the Hello project node in the KXBuild view to make it the startup project.
1kxbuild project spm2app . -n Hello -b com.yourname.hello
Replace the bundle ID with your own reverse domain name. You’ll use it later to create provisioning profiles and to create the app in App Store Connect. After the conversion, the package folder has a new subfolder named after the app, which holds the app project.
 1Hello\
 2├─ Package.swift
 3├─ Sources\
 4│  ├─ Hello\
 5│  └─ HelloCore\
 6└─ Hello\
 7   ├─ .gitignore
 8   ├─ Hello.xcodeproj
 9   └─ Hello\
10      └─ Assets.xcassets
The app project doesn’t copy any source code. It compiles the Sources\Hello folder directly and references the package’s other targets as a local package. So editing the package’s code is editing the app, and you should commit this subfolder to version control together with the package. The .gitignore inside it already excludes build output and the certificate folder.
In the example the app uses HelloCore, but the package doesn’t expose it as a library product, so the app project can’t reference it. In that case the conversion adds a line to the products in Package.swift. The extension shows a notification about it, and the command line lists it under manifestChanges in its output. After converting, review and commit this change to Package.swift.
1    products: [
2        .executable(name: "Hello", targets: ["Hello"]),
3        .library(
4            name: "HelloCore",
5            targets: [ "HelloCore" ]
6        ),
7    ],
If you don’t have a certificate yet, you can build once without signing to make sure the project is fine.
1kxbuild build .\Hello\Hello.xcodeproj -D CODE_SIGNING_ALLOWED=NO
Swift Playgrounds app projects
An app project created in Swift Playgrounds is a .swiftpm folder whose Package.swift contains import AppleProductTypes and describes the app with .iOSApplication. Packages like this can’t be converted directly yet, and running the conversion reports that they aren’t supported. Instead, create a separate regular package, copy the source code into it and convert that. The original .swiftpm stays untouched, and you can keep opening it on your iPad.
The example uses D:\projects\PGApp.swiftpm. First copy its .swift files, including subfolders, into the Sources\PGApp folder of the new package, leaving out Package.swift.
1robocopy D:\projects\PGApp.swiftpm D:\projects\PGApp\Sources\PGApp *.swift /S /XF Package.swift
Then create a Package.swift in D:\projects\PGApp with the content below. Set the minimum iOS version to match platforms in the original project.
 1// swift-tools-version: 5.9
 2import PackageDescription
 3
 4let package = Package(
 5    name: "PGApp",
 6    platforms: [.iOS(.v16)],
 7    targets: [
 8        .executableTarget(name: "PGApp")
 9    ]
10)
Then convert it as in the previous section. Pass the bundle ID from the original project’s .iOSApplication with -b. Change the version, display name and icon in the editors described in the next section. If the original project has an Assets.xcassets, copy its image sets and color sets into the new app project’s Assets.xcassets.
1cd D:\projects\PGApp
2kxbuild project spm2app . -b com.yourname.pgapp
Change the name, icon and usage descriptions
Name and version
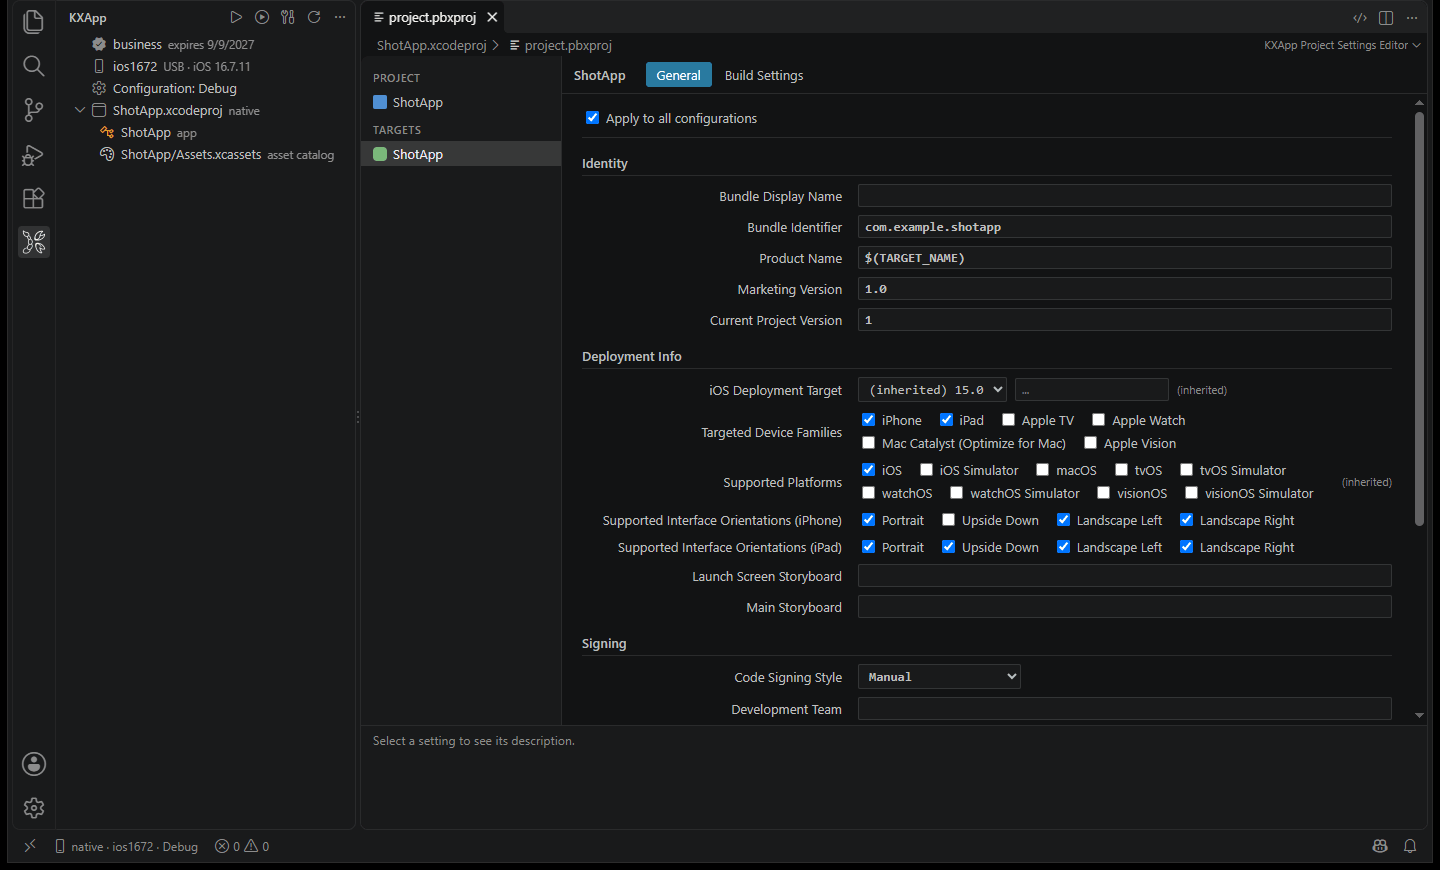
In the KXBuild view, right-click the Hello target and choose KXBuild: Edit Target Settings. On the General tab you can change the Display Name, Bundle Identifier, version and minimum iOS version. Press Ctrl+S to save. See Project Settings Editor for each field.
Icon
The icon lives in the app project’s Hello\Hello\Assets.xcassets. Open it by clicking the asset catalog under the project node in the KXBuild view, then replace the AppIcon placeholder with a 1024×1024 PNG. See Asset Catalog Editor.
Usage descriptions
The converted project has no Info.plist file. One is generated at build time. When you use permissions such as the camera, photo library or location, write the description text as a build setting starting with INFOPLIST_KEY_, and it ends up in the app’s Info.plist after the build. For the camera, use either of these.
- VS Code extension. In the Project Settings Editor, switch to the Build Settings tab, right-click a value cell and choose “Add User-Defined Setting”. Enter
INFOPLIST_KEY_NSCameraUsageDescriptionas the name and the text shown to users as the value, then press Ctrl+S to save. - Command line. Run the command below in the package folder.
1kxbuild project add-setting -k INFOPLIST_KEY_NSCameraUsageDescription -v "Used to scan QR codes" -t Hello -P .\Hello\Hello.xcodeproj
Debug on your iPhone
Running on a device needs an Apple Development certificate (.p12) and a Development provisioning profile that includes this iPhone’s UDID. Create a keychain folder in the app project folder Hello\Hello and put both files in it. Then create password.properties with one line in the form file=password. To share them with every project, put them in the keychain folder under the KXBuild install folder instead. See Certificates and signing for how to get them.
1development.p12=123456
Connect the iPhone with the cable and select it under the Device node in the KXBuild view. On the first connection you install the device drivers, tap Trust on the phone and turn on Developer Mode. See Set up your device.
Make sure the startup project is Hello, set a breakpoint in the code under Sources\Hello and press F5. KXBuild builds, signs, installs and launches the app, and stops at the breakpoint. Breakpoints also work in library targets such as HelloCore. After changing code, press Shift+F5 to stop, then F5 again. For inspecting variables, the debug console and tracking down crashes, see Debug iOS apps on Windows with LLDB, breakpoints and crash logs.
Keep developing, change code and add dependencies
You convert only once. After that, develop in the package as usual. What to do depends on the kind of change.
- Editing code, or adding or deleting .swift files in
Sources\Hello. Just build or press F5. The app project follows this folder, so there’s nothing else to do. - Editing code in the package’s library targets. Just build as well.
- Adding a dependency to the app’s executable target. After changing Package.swift, add the same dependency to the app project, or the build fails with
no such module.
If the new dependency is another target in the package, first add a library product for it to the products in Package.swift, for example .library(name: "HelloExtra", targets: ["HelloExtra"]). Then use either of these.
- VS Code extension. Run
KXBuild: Add Swift Package Dependency…from the Command Palette, choose the package folderD:\projects\Helloas a local package and pick the HelloExtra product. - Command line. Run the command below in the package folder.
1kxbuild project add-package -P .\Hello\Hello.xcodeproj --path . --product HelloExtra
If the new dependency is a remote package, add the same package and product to the app project, with the same version rule as in Package.swift. Use either of these.
- VS Code extension. Run
KXBuild: Add Swift Package Dependency…from the Command Palette, enter the package’s Git URL, then choose the version rule and product. - Command line. Run the command below in the package folder. This example uses Alamofire.
1kxbuild project add-package -P .\Hello\Hello.xcodeproj --url https://github.com/Alamofire/Alamofire.git --from 5.9.0 --product Alamofire
Build an .ipa for the App Store
For the App Store you need an Apple Distribution certificate and an App Store provisioning profile. Put them in the same keychain folder and add a password line to password.properties. Then use either of these.
- VS Code extension. Switch the Build configuration node in the KXBuild view to Release, then run
KXBuild: Buildfrom the Command Palette. - Command line. Run the command below in the package folder.
1kxbuild build .\Hello\Hello.xcodeproj -c Release
The build produces Hello\build\Hello.ipa. For the full process of creating the app in App Store Connect, uploading the .ipa, filling in the listing and submitting for App Review, see Publish to the App Store on Windows, from .ipa upload to review.
FAQ
It says only provides libraries
The package has only library products and no app. Packages like this aren’t converted. Create a new app project and add the package to it as a local package. See Develop Swift iOS apps on Windows.
It says has no app to convert
No app entry point was found in the executable target, so it’s a command-line program. Make sure the entry file has an App struct marked with @main, or a UIApplicationDelegate.
The package has more than one app
On the command line, use --executable to pick the one to convert. Convert each app separately, and each project is created in its own subfolder.
1kxbuild project spm2app . -n HelloPro -b com.yourname.hellopro --executable HelloPro
It says choose another place with -o
The executable target’s source folder is the package root (Package.swift has path: "."), so a project created inside the package would be compiled as part of the app’s source. Use -o to put the project outside the package folder, for example -o ...
The conversion output has warnings
Some settings of the executable target in Package.swift aren’t carried over to the app project, and the output lists each one.
- resources. Resources are copied into the app, but the app has no
Bundle.module, so change code that loads resources to useBundle.main. - Compiler settings such as swiftSettings and linkerSettings. Set them again on the Build Settings tab of the Project Settings Editor.
- Build plugins. They don’t run in the app project.
Linking fails with an undefined …vpfi symbol
If a Debug build fails at the link step with undefined symbol: …vpfi, you’ve hit a known issue in the open-source Swift compiler. It happens with a property that has an initial value, such as @State private var count = 0, when the struct’s init is in another file. The app’s code lives in the package, which is a local package and is compiled file by file by default. Set the environment variable KXBUILD_SWIFT_WHOLE_MODULE=all to build it as a whole module, reopen VS Code and build again.
1setx KXBUILD_SWIFT_WHOLE_MODULE all
Can I convert again
Yes, add --force to regenerate in the same folder. The whole app project is rebuilt, though, so any changes you made in the project settings and any icon you replaced are reset. If you only added dependencies, add them as described above instead of converting again.