
iOS app icon sizes, launch screen and localization done right
When your app’s features are done and you’re getting ready to submit, the icon, launch screen and localization are usually the last three things you think of. Missing any of them can block your upload or make the app look wrong once it’s live. This tutorial sets up all three in the order you’d do them, for developers whose app already runs on an iPhone and who are preparing for App Review. Before you start, have a 1024×1024 source image for the icon, and a computer with KXBuild and the VS Code extension installed. If you haven’t installed them yet, follow the install page.
App icon
Prepare the source image
An iOS icon only needs one 1024×1024 square PNG. Every other size is generated from it. Keep three things in mind when you make it.
- Don’t draw rounded corners yourself. The system masks the icon into a rounded rectangle for each device, and corners you draw leave a ring of background color after masking.
- No alpha channel. The 1024 App Store image is rejected if it has an alpha channel, and transparent areas show up black on the phone. Export without transparency, or put a solid background layer underneath first.
- Leave a margin around the artwork. Keep roughly a tenth of the width empty on each side so the artwork doesn’t touch the edges after masking.
Generate every size from one image
In the KXBuild view, click the asset catalog under the project node (usually Assets.xcassets) to open the Asset Catalog Editor, then select AppIcon.
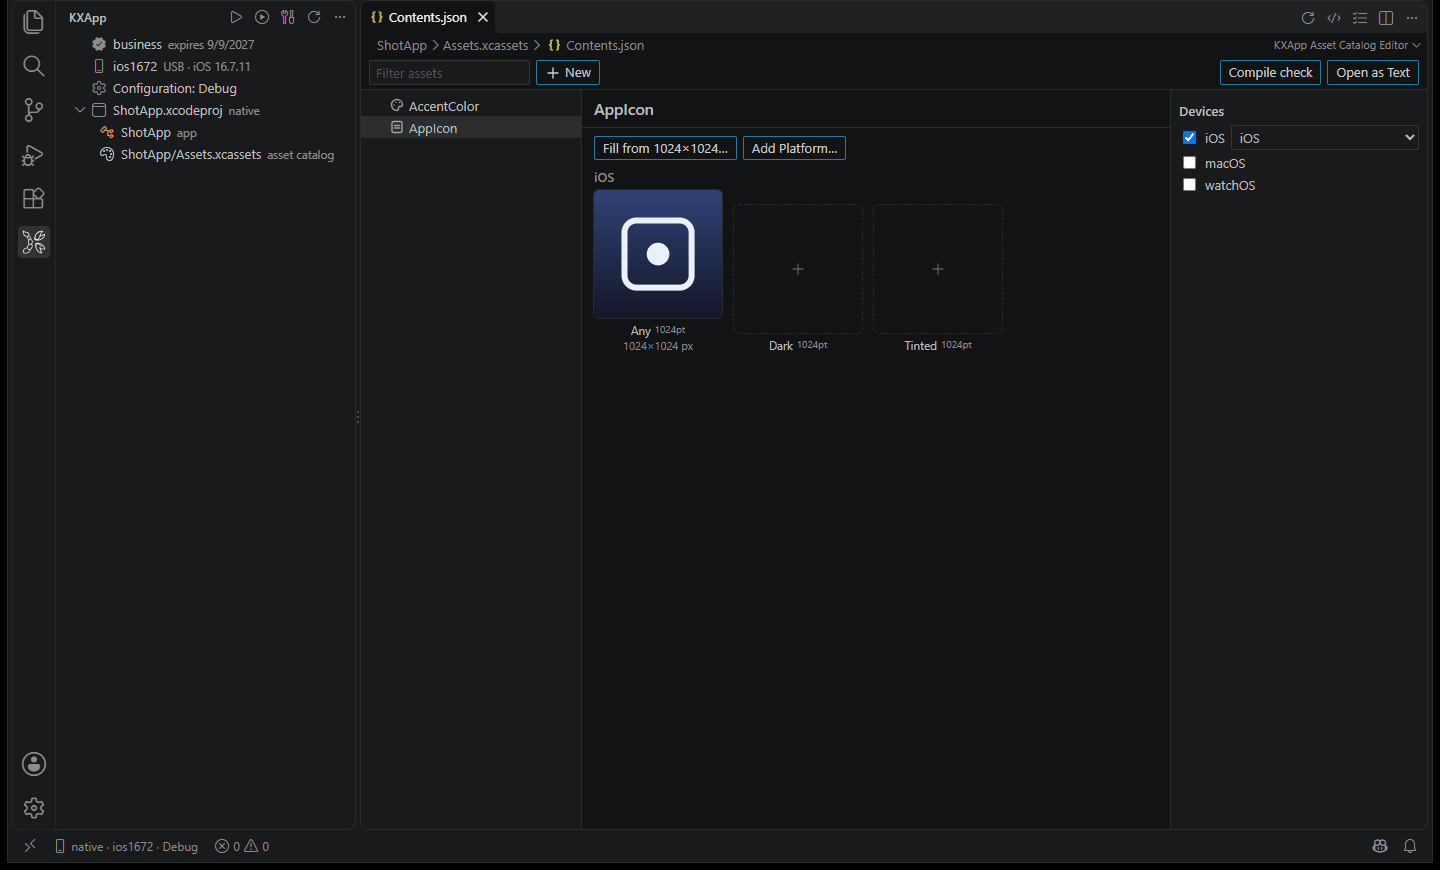
Right-click AppIcon, choose Fill All Sizes from 1024×1024 Image… and pick your source image. Every slot is filled with a scaled copy. If the icon set uses the single-size format, it has only one 1024 slot and the other sizes are generated at build time. KXBuild templates and projects created in Xcode 14 or later use single size by default.
The only difference between the two formats is whether you provide separate artwork for small sizes.
| Format | When to use it |
|---|---|
| Single size (one 1024 image) | The artwork is simple and stays clear when scaled down. Most apps use this |
| All sizes | The artwork has fine detail, and small sizes such as 20pt and 29pt need simplified versions |
For an older project with per-size images, right-click AppIcon and choose Convert to Single Size Icon to simplify it. The editor tells you how many old files are no longer referenced, and you can delete them as prompted.
Starting with iOS 18, users can switch Home Screen icons to a dark or tinted style. If you leave the Dark and Tinted slots in AppIcon empty, the system handles them automatically. To control them yourself, fill those two appearances as well when you generate all sizes. Dark icons can have a transparent background. Only the 1024 image for the default appearance must not have an alpha channel.
The editor checks the catalog when it opens. A missing 1024 icon, wrong image sizes and alpha channels all show up in the Problems panel. Before you submit, click KXBuild: Compile-check Asset Catalog in the editor title bar and choose iOS to check again with the rules of a real build.
Xcode 26 .icon icons
.icon is the Icon Composer icon document introduced in Xcode 26. It describes the icon in layers, so on iOS 26 it gets Liquid Glass lighting and glass effects and adapts to light, dark and tinted appearances. Use it when you want your icon to match the new iOS 26 look. If a flat icon is all you need, keep using the AppIcon set above, which works on every iOS version.
.icon files are usually made with Icon Composer on a Mac. Once you have one, put it in your project, right-click the .icon folder in the Explorer and choose KXBuild: Open Icon Document (.icon). You can add and remove layers, import SVG or PNG artwork, adjust fill, Liquid Glass and shadow effects, and switch platforms and appearances with a live preview. See Icon Document Editor for details.
Launch screen
The launch screen is what shows between tapping the app and its first screen appearing, and the App Store requires every app to have one. iOS offers two ways to define it, the UILaunchScreen dictionary in Info.plist and a launch storyboard. Use the first for new projects. There’s no layout to draw, just a few keys to fill in.
Set the background color and image with UILaunchScreen
KXBuild templates and new SwiftUI projects from Xcode include an empty UILaunchScreen by default, which shows the system background color at launch, white in light mode and black in dark mode. To use your brand color and logo instead, first prepare two things in the asset catalog.
- In the Asset Catalog Editor, right-click the empty area on the left, choose New Color Set, name it
LaunchBackgroundand set the color. Color sets can define a color per appearance, so give dark mode a darker color. - Right-click, choose New Image Set, name it
LaunchLogoand put your logo in the 2x and 3x slots. The image is centered at its original size and isn’t stretched to fill the screen.
Then add these two names to Info.plist. If your project has an Info.plist file, double-click it to open it in the Property List Editor. Projects with a generated Info.plist (KXBuild templates work this way) don’t have the file. Create an Info.plist in the app’s source folder with the content below, then in the Project Settings Editor, on the General page under Build, set Info.plist File to its path, for example MyApp/Info.plist. At build time the keys in the file are merged with the generated ones.
 1<?xml version="1.0" encoding="UTF-8"?>
 2<!DOCTYPE plist PUBLIC "-//Apple//DTD PLIST 1.0//EN" "http://www.apple.com/DTDs/PropertyList-1.0.dtd">
 3<plist version="1.0">
 4<dict>
 5	<key>UILaunchScreen</key>
 6	<dict>
 7		<key>UIColorName</key>
 8		<string>LaunchBackground</string>
 9		<key>UIImageName</key>
10		<string>LaunchLogo</string>
11	</dict>
12</dict>
13</plist>
If you already have an Info.plist, find or add UILaunchScreen as a Dictionary in the editor and use Add Child to add UIColorName and UIImageName as two Strings. UILaunchScreen also supports UIImageRespectsSafeAreaInsets (a Boolean that keeps the image clear of the notch and the Home indicator) as well as UINavigationBar, UITabBar and UIToolbar. Add these if your first screen has a navigation bar or tab bar, so the transition from launch screen to first screen looks smoother.
iOS caches the launch screen. If you still see the old one after pressing F5, delete the app from the phone and install it again. If it still hasn’t changed, restart the phone.
Storyboard launch screens
Most older projects brought over from Xcode use LaunchScreen.storyboard. It’s still built and the launch screen looks the same. KXBuild has no visual storyboard editor, and Launch Storyboard on the General page of the Project Settings Editor only takes a file name. To change the layout, edit the XML in text mode or go back to Xcode on a Mac.
If your launch screen is just a background and a logo, switch to UILaunchScreen from the previous section. Clear Launch Storyboard on the General page first, then add UILaunchScreen as described above. Don’t keep both.
Localization
Localization has three parts, the text in your app’s UI, the app name on the Home Screen, and your App Store listing. The first two ship inside the .ipa. The third is filled in on the App Store Connect website.
Localize UI text with .xcstrings
.xcstrings is the string catalog introduced in Xcode 15. One file holds the translations for every language and is compiled into per-language .lproj folders at build time. Use it for new projects. Existing Localizable.strings files in older projects keep working.
You don’t need to change your code. String literals in SwiftUI views such as Text("Settings") and Button("Save") are treated as localizable keys automatically. Elsewhere, use String(localized:).
1Text("Settings")
2let title = String(localized: "Delete this item?")
If your project doesn’t have a string catalog yet, create an empty Localizable.xcstrings file in the app’s source folder. A new file has to be added to the app target to end up in the app. If the project uses folder sync from Xcode 16 onward (shown as blue folders in Xcode), putting the file in the source folder is enough. KXBuild templates and older projects use groups, so register the file once with the command below.
1kxbuild project add-resource -f MyApp/Localizable.xcstrings -t MyApp -P .\MyApp.xcodeproj
Double-clicking a .xcstrings file opens it in the KXBuild Localization Editor. .strings files in xx.lproj folders open in the same editor, with every language side by side in one table. Then do three things.
- Click KXBuild: Sync Strings with Source Code in the editor title bar. The editor scans your code and lists every string from
Text("…"),String(localized:)and similar calls. When you add new text to your code later, click it again. - Click KXBuild: Add Language… and choose the languages you want to support, such as Simplified Chinese. Added languages are also registered in the project.
- Fill in the translations row by row in the table. When source text changes, existing translations are marked Needs Review so you remember to check them.
For sentences with counts (“1 item”, “3 items”), right-click and choose Vary by Plural, then fill in each form according to the language’s plural rules. For keys that shouldn’t be translated, such as brand names, right-click and choose Toggle Don’t Translate.
When you’re done, press F5, switch the phone to the target language in Settings > General > Language & Region, and open the app to check. Long text is easily truncated in languages such as German and Russian, so leave enough width for buttons and labels.
Localize the app name
The app name on the Home Screen comes from CFBundleDisplayName in Info.plist. First fill in Display Name on the General page of the Project Settings Editor. That’s the name in the source language. Translate the name for other languages in InfoPlist.xcstrings. The file must have exactly this name, live in the app’s source folder, and be added to the target as above.
 1{
 2  "sourceLanguage" : "en",
 3  "strings" : {
 4    "CFBundleDisplayName" : {
 5      "localizations" : {
 6        "zh-Hans" : {
 7          "stringUnit" : { "state" : "translated", "value" : "待办" }
 8        }
 9      }
10    }
11  },
12  "version" : "1.0"
13}
After that, open it in the Localization Editor to add languages and change the translated names. Permission descriptions for the camera, location and so on (NSCameraUsageDescription and similar) are translated in this file too, using the Info.plist key names as keys.
Only about a dozen characters fit under a Home Screen icon, so a Display Name that’s shorter than your store name works better.
Localize your App Store listing in App Store Connect
The name, subtitle, description, keywords and screenshots in the store are filled in per language, independently of the translations in your app.
- Open your app in App Store Connect. On the App Information page, add a language from the language menu at the top right, then fill in the name and subtitle for that language, each up to 30 characters.
- Go to the version page, switch to the same language, and fill in the description, keywords, promotional text and screenshots. If a language has no screenshots, the store shows the ones from the primary language.
Write names and keywords for how people search in each region rather than translating them literally. In mainland China, the Simplified Chinese name and keywords decide whether users can find your app, so they deserve separate thought.
Pre-submission checklist
- The 1024 image in AppIcon has no alpha channel, and KXBuild: Compile-check Asset Catalog reports no errors.
- If you use an .icon, check it in the editor in light, dark and tinted appearances.
- After deleting and reinstalling the app, the launch screen shows the new background color and logo, in dark mode too.
- Only one of
UILaunchScreenand Launch Storyboard is set. - With the phone switched to each supported language, the UI has no untranslated or truncated text, and the Home Screen name is correct.
- In App Store Connect, the name, description and keywords are filled in for every language, and the text in screenshots matches the language.
Once all of these check out, follow Publish to the App Store on Windows, from .ipa upload to review to build a Release version and submit it for review.