
Build an iOS app on Windows with SwiftUI and run it on your iPhone
This tutorial starts from an empty project and builds a to-do list app in SwiftUI on Windows. You’ll run it on your own iPhone, debug it with breakpoints, and finally package it for friends or coworkers. It’s for people who know a bit of programming and are writing iOS for the first time, and for iOS developers who only have a Windows PC at hand. It takes about an hour.
You need three things before you start. An Apple Developer account to create certificates and provisioning profiles. An iPhone and a cable that carries data. A PC with KXBuild and the VS Code extension installed. If you haven’t installed them yet, follow the install page.
Create the project
Use either of these.
- VS Code extension. Press Ctrl+Shift+P to open the Command Palette and run
KXBuild: New Project. Pick the “iOS App (SwiftUI)” template, enterMyTodoas the project name, change the bundle ID to your own reverse domain, for examplecom.yourname.mytodo, and choose a folder. When it’s done, choose “Open in New Window”. - Command line. Run the command below in PowerShell, then open
D:\projects\MyTodowith File > Open Folder… in VS Code.
1kxbuild project create -t app_swiftui -n MyTodo -b com.yourname.mytodo -o D:\projects
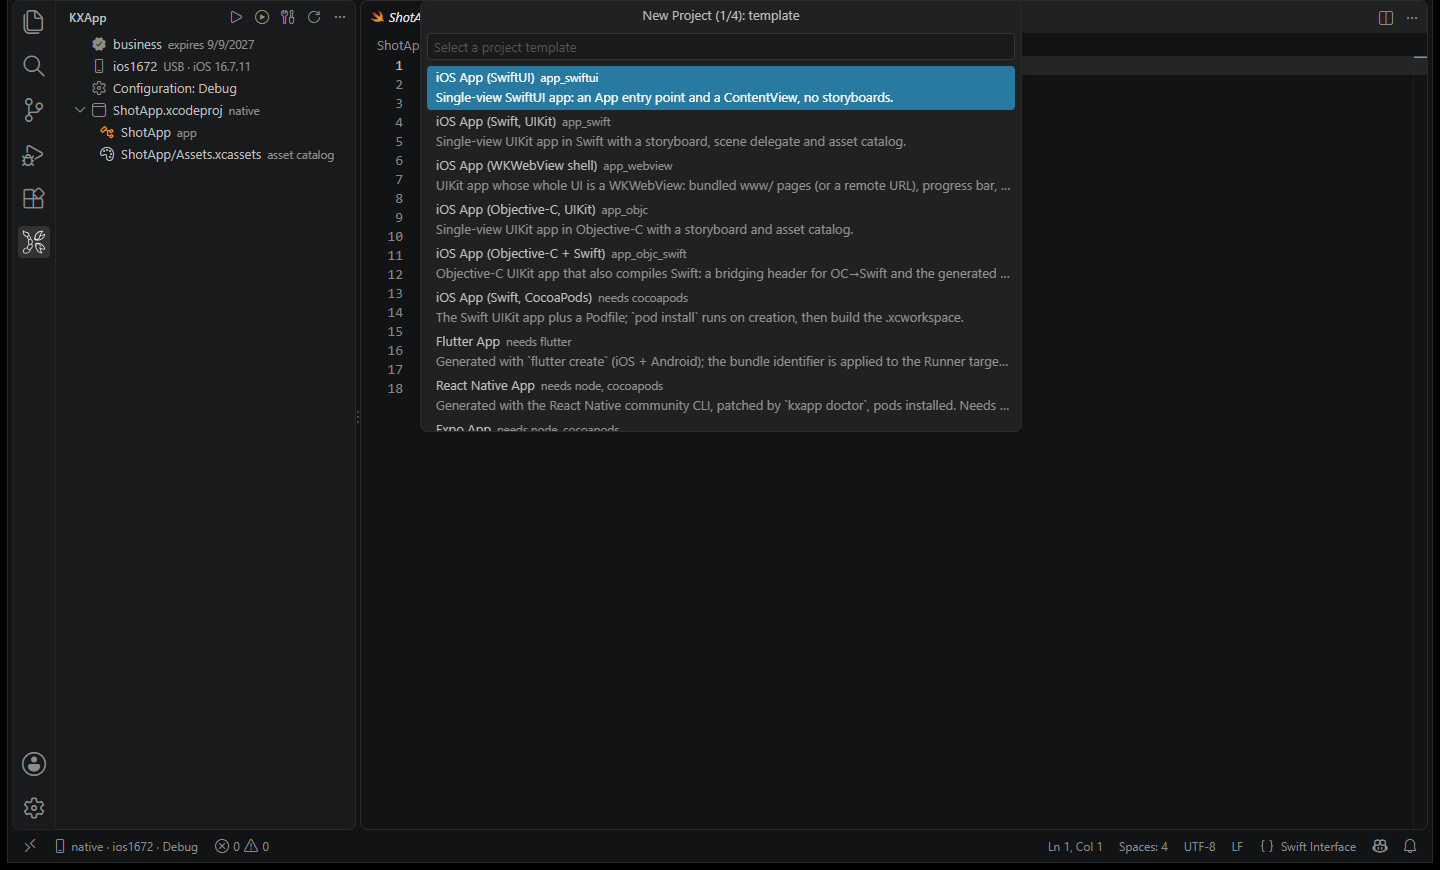
Once it’s open, the KXBuild view on the left lists the MyTodo project and an app target of the same name. The project has only three things. MyTodoApp.swift is the app entry point, ContentView.swift is the main screen, and Assets.xcassets holds the icon and colors. All the code below goes into ContentView.swift, so you don’t need to add new files to the project.
The bundle ID is your app’s unique identifier with Apple. You’ll use the same one later for the provisioning profile and the app record in App Store Connect, so settle on it now and don’t change it afterward.
Step 1. Build the list
Start with a read-only list with the data hard-coded. Replace the whole contents of ContentView.swift with this.
 1import SwiftUI
 2
 3struct TodoItem: Identifiable, Codable {
 4    var id = UUID()
 5    var title: String
 6    var done = false
 7}
 8
 9struct ContentView: View {
10    @State private var items = [
11        TodoItem(title: "Buy milk"),
12        TodoItem(title: "Give the app a new icon"),
13        TodoItem(title: "Send the ipa to a coworker", done: true)
14    ]
15
16    var body: some View {
17        NavigationView {
18            List(items) { item in
19                HStack {
20                    Image(systemName: item.done ? "checkmark.circle.fill" : "circle")
21                        .foregroundColor(item.done ? .green : .secondary)
22                    Text(item.title)
23                        .strikethrough(item.done)
24                }
25            }
26            .navigationTitle("To-dos")
27        }
28    }
29}
TodoItem holds one to-do. Identifiable lets List tell the rows apart, and Codable is for saving to a file in step 3. Whenever an array marked @State changes, the view refreshes on its own.
As you type, you’ll see completion at work. After Text(item.title). you get modifiers such as strikethrough, font and foregroundColor, and the parameters of Image(systemName:) and the initializers of List complete too. Press F12 on your own types to go to the definition. Mistakes get a red squiggle, and the Problems panel has the full error message. Code completion takes a few seconds to start the first time you open a Swift file. If nothing completes, run KXBuild: Restart Code Completion from the Command Palette. For more, see Code completion and indexing.
Run it on your iPhone
The first time you run on a device, you need to do two things, put your certificate in place and connect the phone. After that, you only press F5.
Add your certificate
Running on a device needs an Apple Development certificate (.p12) and a Development provisioning profile (.mobileprovision) that includes the UDID of this phone. If you don’t have them, you can sign in to your developer account in Appuploader to create them, or export them from the keychain on a Mac. See Certificates and signing for the options. To find the phone’s UDID, connect it to your PC and run the command below. It’s the first column.
1kxdevice device list
Create a keychain folder in the project root and put both files in it. Then create password.properties with one line in the form file=password.
1development.p12=123456
The .gitignore that comes with the template already excludes the keychain folder, so your certificates won’t be committed.
Connect the phone
Connect the iPhone to your PC with the cable, then click it under the Device node in the KXBuild view to make it the current device. The first connection involves these steps. See Set up your device for details.
- If the device node says “click to set up”, click it to install the Apple device drivers. You’ll be asked for administrator permission once.
- When the phone shows Trust This Computer, unlock it and tap Trust.
- On the phone, turn on Settings > Privacy & Security > Developer Mode. The phone restarts once. The switch only appears after the phone has been connected to a computer.
- The first time you debug a given iOS version, device symbols (several GB) download automatically. This takes about ten minutes or more, and only happens once.
Press F5
Press F5. KXBuild builds, signs, installs and launches the app, then attaches the debugger. The three hard-coded to-dos appear on the phone. The build log is in Output > KXBuild, and compiler errors are in the Problems panel. Click one to jump to the line.
If launching fails, the notification tells you which step it stopped at. The most common cause is a provisioning profile that doesn’t include this phone’s UDID. Add the UDID to the profile, download it again and replace the old file in keychain. For other messages, see Run and debug.
Step 2. Add, delete and check off
Now make the list editable. Add a text field at the top, tap a row to toggle it done, swipe left to delete, and use the Edit button in the top-right corner to delete several at once. Replace ContentView with the version below and leave TodoItem as it is.
 1struct ContentView: View {
 2    @State private var items: [TodoItem] = []
 3    @State private var newTitle = ""
 4
 5    var body: some View {
 6        NavigationView {
 7            List {
 8                Section {
 9                    HStack {
10                        TextField("New to-do", text: $newTitle)
11                            .onSubmit(add)
12                        Button("Add", action: add)
13                            .disabled(newTitle.trimmingCharacters(in: .whitespaces).isEmpty)
14                    }
15                }
16                Section {
17                    ForEach($items) { $item in
18                        Button {
19                            item.done.toggle()
20                        } label: {
21                            HStack {
22                                Image(systemName: item.done ? "checkmark.circle.fill" : "circle")
23                                    .foregroundColor(item.done ? .green : .secondary)
24                                Text(item.title)
25                                    .strikethrough(item.done)
26                                    .foregroundColor(.primary)
27                            }
28                        }
29                    }
30                    .onDelete { offsets in
31                        items.remove(atOffsets: offsets)
32                    }
33                }
34            }
35            .navigationTitle("To-dos")
36            .toolbar { EditButton() }
37        }
38    }
39
40    private func add() {
41        let title = newTitle.trimmingCharacters(in: .whitespaces)
42        guard !title.isEmpty else { return }
43        items.append(TodoItem(title: title))
44        newTitle = ""
45    }
46}
ForEach($items) { $item in … } gives you a binding to each row, so item.done.toggle() changes that element of the array directly. onDelete handles both swipe to delete and deleting in edit mode.
After changing code, stop debugging (Shift+F5) and press F5 again. The Restart button on the debug toolbar doesn’t recompile.
Set a breakpoint and inspect variables
In add(), click to the left of the line number on the items.append(...) line. A red dot appears. Back on the phone, type a to-do and tap “Add”. The app pauses and VS Code switches to the Run and Debug view.
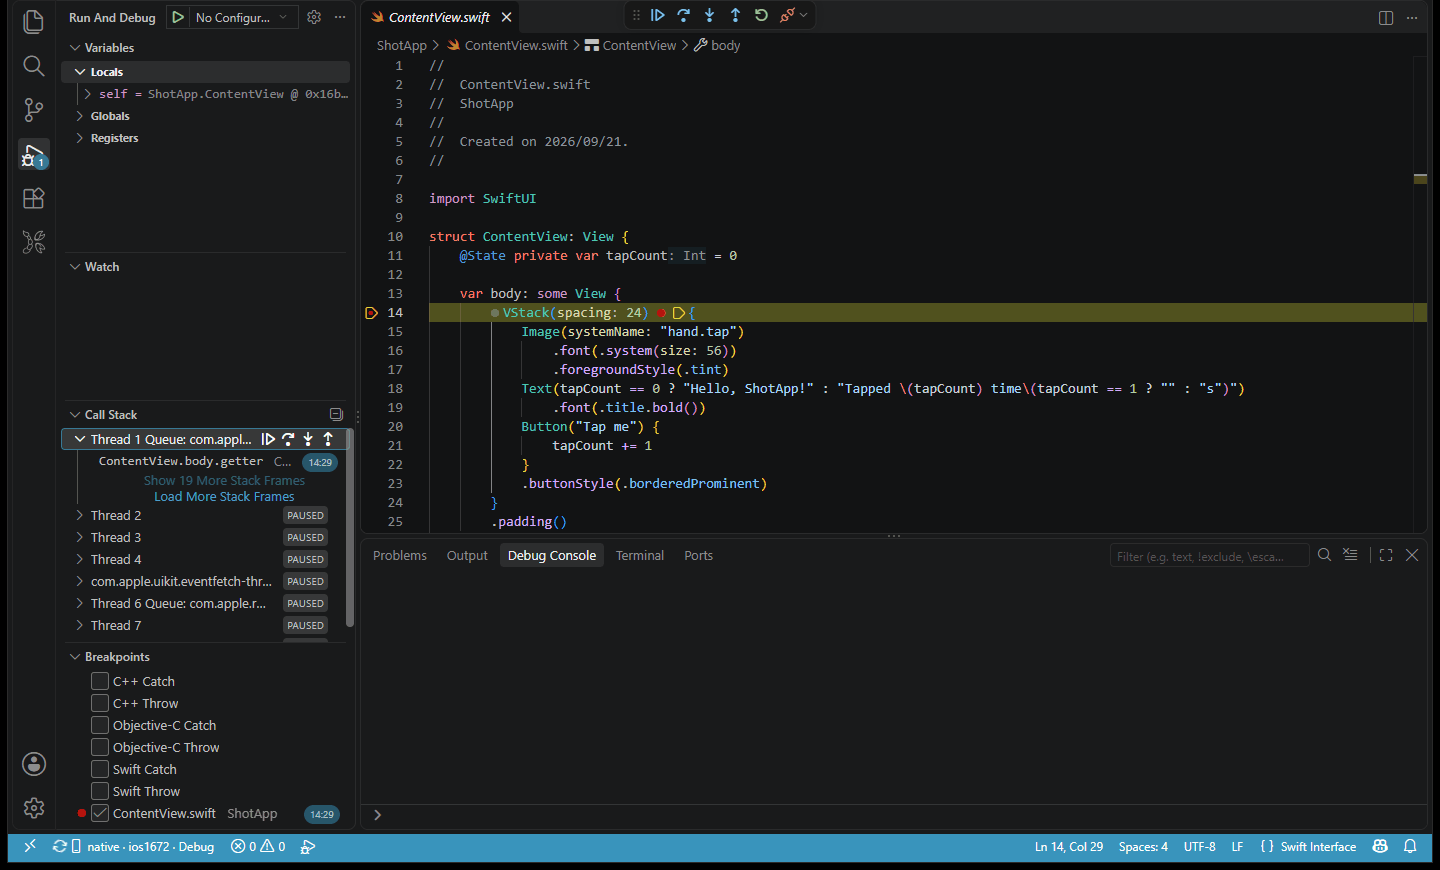
Variables on the left shows the value of title, and Call Stack shows how the call got there. Press F10 to step over one line and F5 to continue. You can type lldb commands in the Debug Console below, for example po title to print the current title. Output from print in your code appears in Output > KXBuild Console.
Step 3. Save the data to a file
Right now the to-dos are gone when you close and reopen the app. Save the list as a JSON file in the app’s Documents folder, write it on every change, and read it back at launch.
Put the data and the file logic in a TodoStore so the view only displays. Add this class below TodoItem in ContentView.swift.
 1final class TodoStore: ObservableObject {
 2    @Published var items: [TodoItem] = [] {
 3        didSet { save() }
 4    }
 5
 6    private let fileURL = FileManager.default
 7        .urls(for: .documentDirectory, in: .userDomainMask)[0]
 8        .appendingPathComponent("todos.json")
 9
10    init() {
11        if let data = try? Data(contentsOf: fileURL),
12           let saved = try? JSONDecoder().decode([TodoItem].self, from: data) {
13            items = saved
14        }
15    }
16
17    private func save() {
18        do {
19            let data = try JSONEncoder().encode(items)
20            try data.write(to: fileURL, options: .atomic)
21        } catch {
22            print("Save failed: \(error)")
23        }
24    }
25}
Then change four places in ContentView to use the store instead of the @State array.
1    @StateObject private var store = TodoStore()   // replaces @State private var items
2    // …
3    ForEach($store.items) { $item in               // was ForEach($items)
4    // …
5    store.items.remove(atOffsets: offsets)         // in onDelete
6    // …
7    store.items.append(TodoItem(title: title))     // in add()
Changing the @Published array triggers didSet, so checking off, deleting and adding each write the file once. Assigning items inside init doesn’t trigger didSet, so reading the file at launch doesn’t write it straight back.
Press F5 again and add a few to-dos. Swipe the app away in the app switcher, open it again, and the data is still there. To confirm the file really gets written, set a breakpoint on the let data = … line in save() and check off a to-do. When it pauses, type po fileURL in the Debug Console to see the full path of the file in the app’s sandbox.
When your data is just a few switches and a string or two, @AppStorage("key") in UserDefaults is simpler. List data like to-dos fits better in a file, and it’s easier to move to Core Data or SwiftData later.
Change the name and icon
The app shows up on the home screen as MyTodo by default. In the KXBuild view, right-click the target and choose “KXBuild: Edit Target Settings”. On the General page, change Display Name to “To-dos” and press Ctrl+S to save. The same page also has the version number and the minimum iOS version. For what each field means, see Project Settings Editor.
For the icon, open Assets.xcassets from the asset catalog node in the KXBuild view and drop a 1024×1024 image into AppIcon. The other sizes are generated for you. See Asset Catalog Editor. Press F5 once more to see the changes on the phone.
Share the .ipa with others
A Debug build only installs on the phones listed in its provisioning profile. To let others install it, pick one of the options below depending on how many people there are and whether they’re nearby.
Send it to testers with TestFlight
Use TestFlight when testers aren’t nearby or there are many of them. They install the TestFlight app on their iPhone and install your app from the invitation. No UDIDs need to be registered.
Put an Apple Distribution certificate and an App Store provisioning profile in the keychain folder, and add a password line for it in password.properties. Then use either of these.
- VS Code extension. Switch the Build configuration node in the KXBuild view to Release (or run
KXBuild: Select Build Configurationfrom the Command Palette), then runKXBuild: Build. - Command line. Run the command below in the project folder.
1kxbuild build .\MyTodo.xcodeproj -c Release
When it’s done, you’ll find build\MyTodo.ipa in the project folder. Create the app in App Store Connect, upload the .ipa with Appuploader, and once it’s processed, add testers on the TestFlight tab. See Release and App Store submission for details.
Install it on coworkers’ phones with Ad Hoc
For a few fixed test devices, use Ad Hoc. Register your coworkers’ UDIDs on the developer website, create an Ad Hoc provisioning profile that includes those devices, and build Release with the Distribution certificate as above. If keychain has both an App Store profile and an Ad Hoc profile, use -D to pick the one you want.
1kxbuild build .\MyTodo.xcodeproj -c Release -D CODE_SIGN_STYLE=Manual -D CODE_SIGN_IDENTITY="Apple Distribution" -D PROVISIONING_PROFILE_SPECIFIER="MyTodo AdHoc"
Connect your coworker’s phone to your PC and run the command below to install it.
1kxdevice install .\build\MyTodo.ipa